$49One-time paymentUpdates & support included
01
Overview
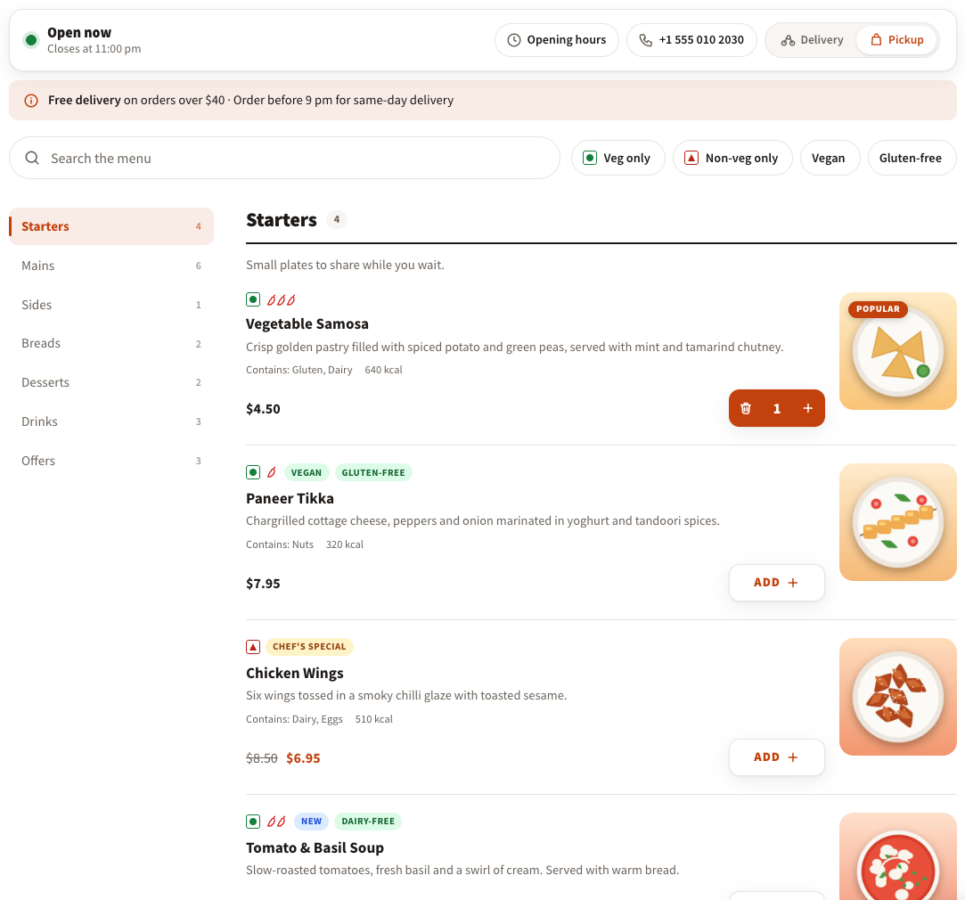
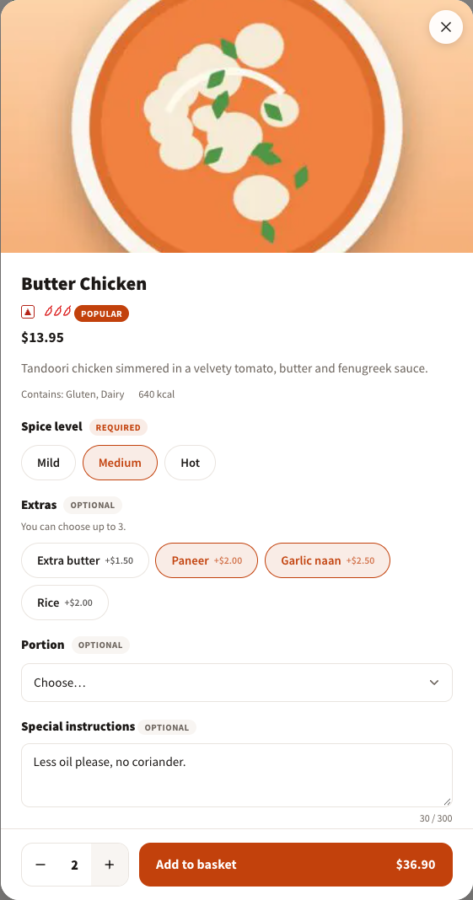
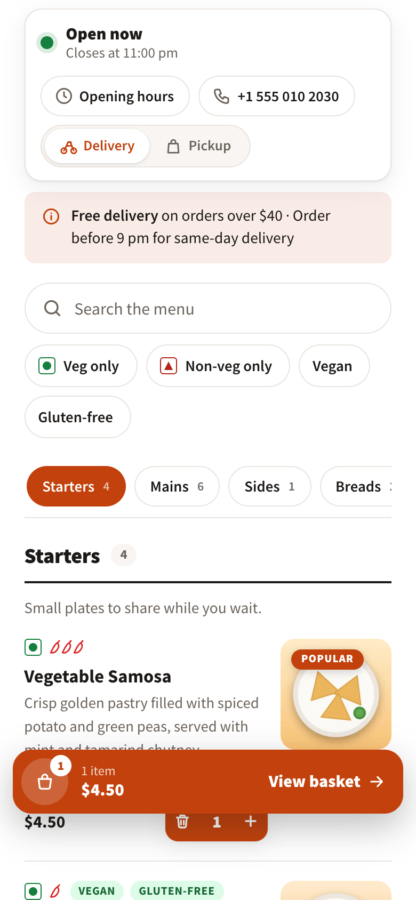
Advanced Restaurant for WooCommerce turns your products into a one-page online ordering menu, the way food-delivery apps work. Customers see whether you are open, choose delivery or pickup, search and filter the menu, add dishes with one tap or open a popup for sizes, add-ons and a note, and check out from a basket drawer without leaving the page.
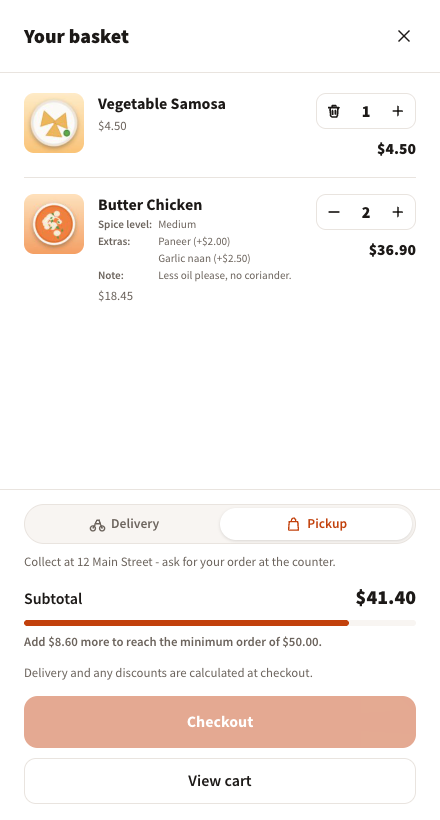
Opening hours with split lunch and dinner periods, closed dates and a preparation time drive the "Open now" status, the next-opening message and the time slots offered at checkout; you decide whether pre-orders are accepted while you are closed. A minimum order amount, a free-delivery hint and the delivery or pickup choice live in the basket.
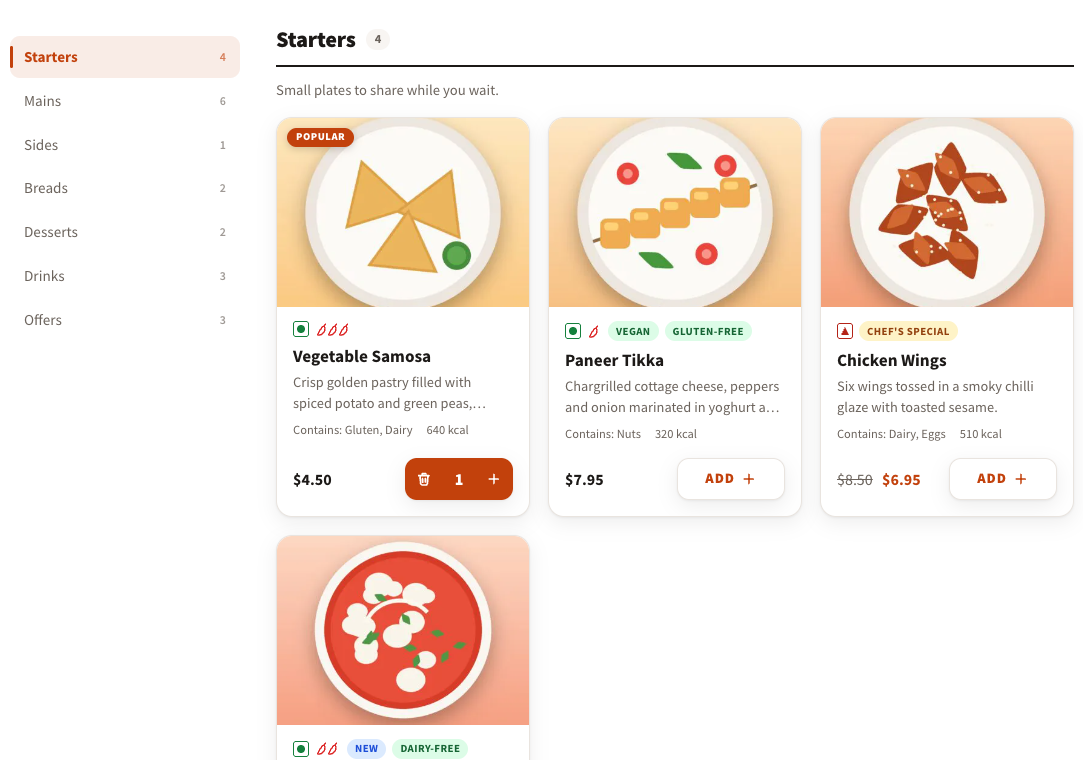
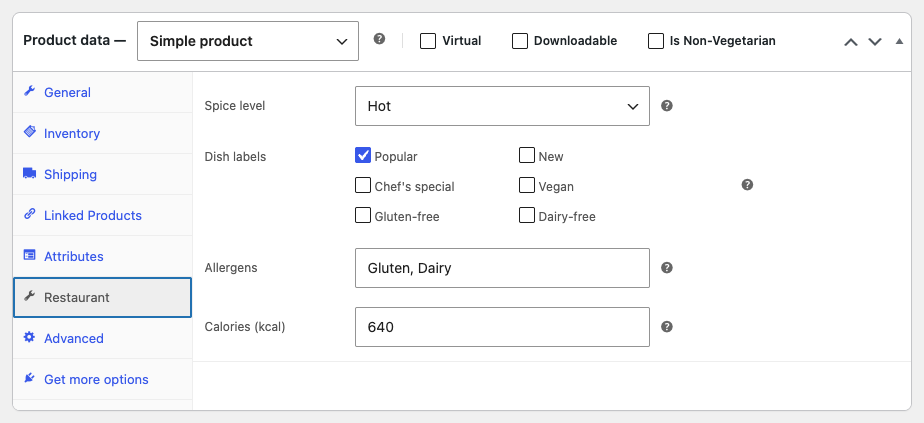
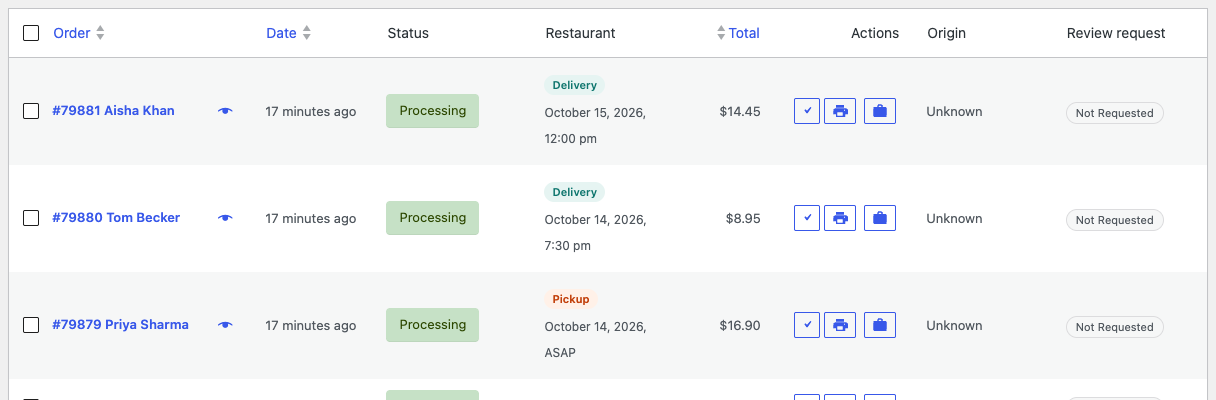
Dishes carry a spice level, labels such as Popular, Vegan or Gluten-free, allergens and calories. The order type, day and time are saved on every WooCommerce order and shown in the e-mails, on the order screen and in a Restaurant column of the orders list. Works with the classic checkout, the Checkout block and HPOS.
02
Why store owners choose it
The whole menu, the dish popup and the basket on one page, built like a food-delivery app, on phones and desktops.
Opening hours, closed dates and a preparation time decide the status, the next opening and the time slots offered.
Delivery or pickup is chosen on the menu and at checkout, saved on the order and matched to your shipping rates.
Add-on prices, the minimum order and the closed state are checked again on the server; classic checkout, Checkout block and HPOS.
One shortcode, settings in WooCommerce > Restaurant, dish details on the product, and your existing products, checkout and e-mails.
03
Features
Open now, or opens Tuesday at 10
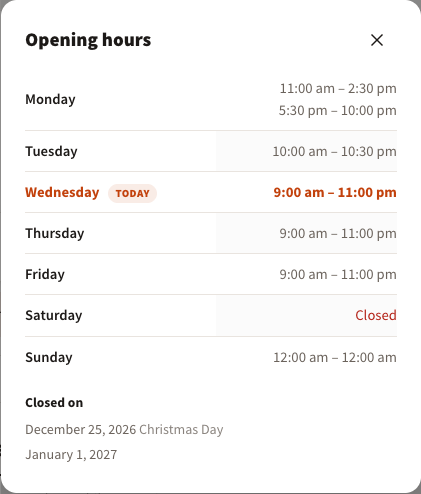
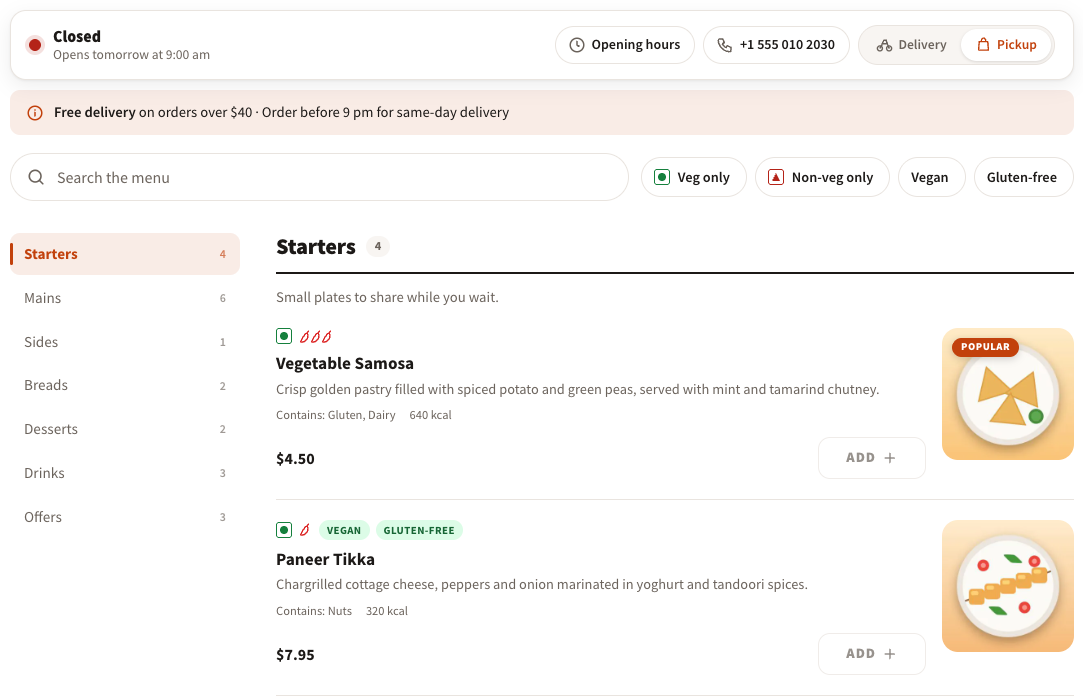
A status bar with the closing time or the next opening, a weekly opening-hours popup with closed dates, a call button and a header message.
Delivery or pickup
Customers switch between delivery and pickup on the menu, in the basket and at checkout; pickup orders only see Local pickup shipping rates.
Dish cards that sell
Photo, price, description, spice level, labels (Popular, New, Chef’s special, Vegan, Gluten-free, Dairy-free), allergens and calories; list or card layout.
Popup with options and add-ons
Variation pills, PPOM add-ons (select, radio, checkbox with min/max, text, textarea) with fixed or percentage prices, and a live total.
Special instructions
A note per dish (“no onions, extra sauce”) that travels from the popup to the basket, the order and the e-mails.
Basket drawer
Quantity steppers, options and notes per line, the minimum-order progress bar, a free-delivery hint and a checkout that waits until the minimum is reached.
Time slots after your lead time
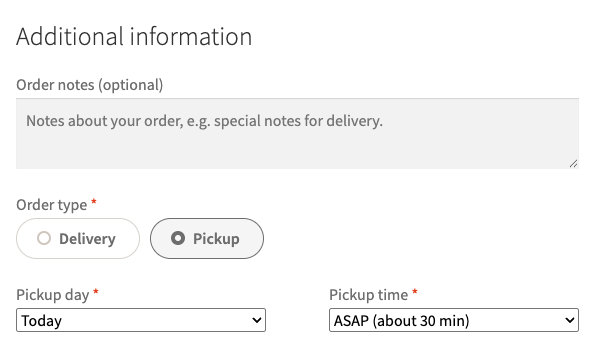
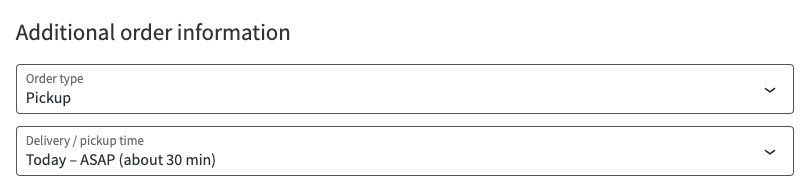
Day and slot fields on the classic checkout and in the Checkout block, built from the opening hours, with “ASAP (about 30 min)” while you are open.
On every order
Order type, day and time on the thank-you page, in the e-mails, on the order screen and in a Restaurant column of the orders list.
Your look in minutes
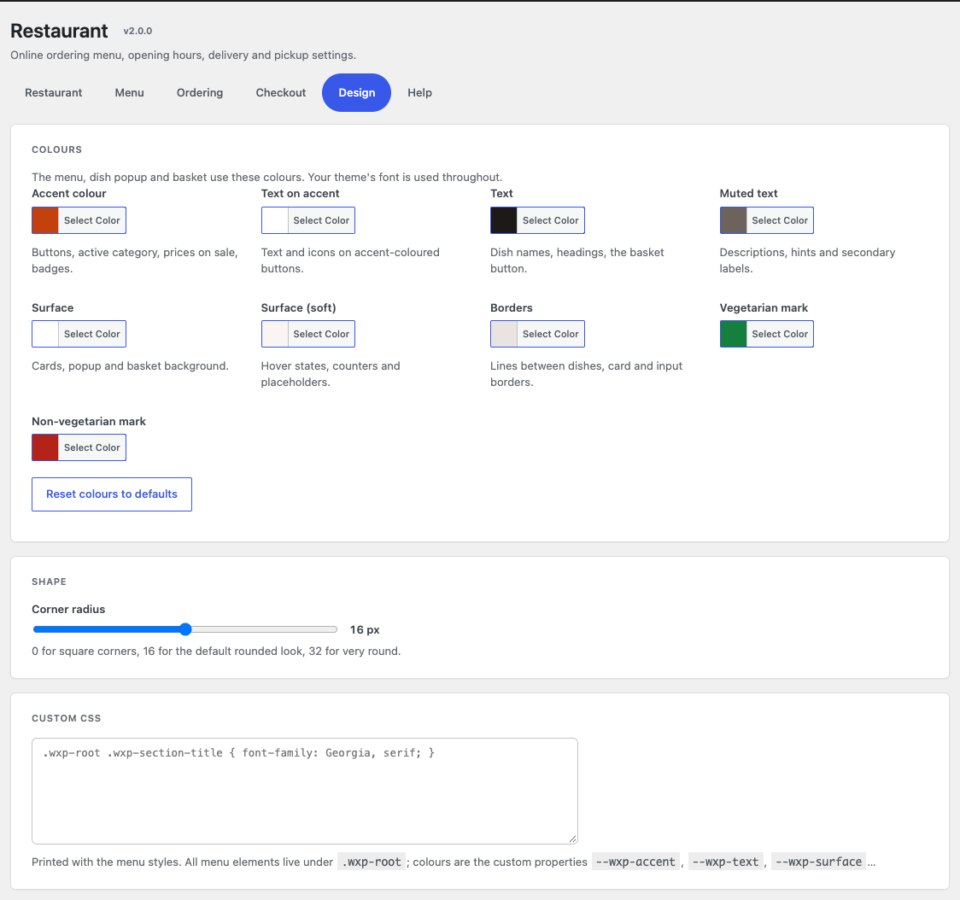
Nine colour tokens, a corner-radius slider, custom CSS, your theme’s font; templates can be overridden in the theme.
04
How it works
- 1
Install and activate
Upload the zip with WooCommerce active, activate it and your licence under Plugins > WpExperts Hub Licences. The free version, if installed, stays idle.
- 2
Describe your dishes
Put products in categories such as Starters or Mains, tick Is Non-Vegetarian where needed and fill the Restaurant tab: spice level, labels, allergens, calories.
- 3
Add the shortcode
Place [wxp_restaurant] on a page, optionally with categories=”starters,mains” or layout=”grid”.
- 4
Set hours and ordering
In WooCommerce > Restaurant set the opening hours, closed dates, delivery or pickup, lead time, minimum order, checkout fields and colours.
05
Screenshots & demo
06
Settings & configuration
Status and messages
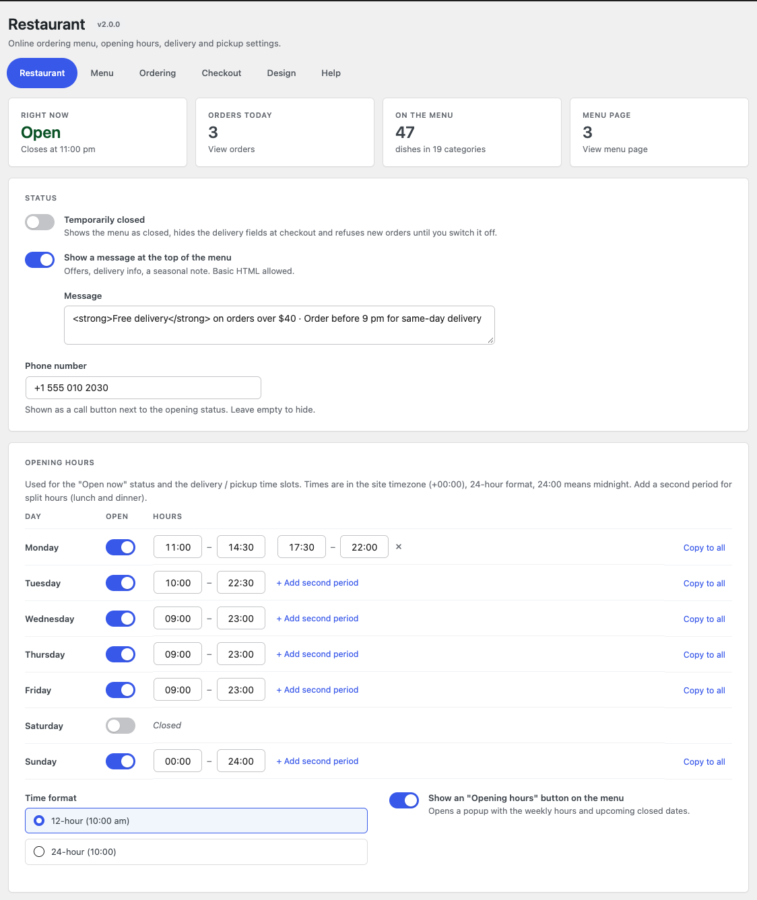
RESTAURANTTemporarily closed switch with its own message, a header message for offers, and the phone number shown as a call button.
Opening hours
RESTAURANTAn Open switch per day, up to two periods (lunch and dinner), “Copy to all”, 12- or 24-hour format, and an Opening hours button on the menu.
Closed dates
RESTAURANTHolidays and private events as a list of dates with an optional label; no slots are offered on those days.
Layout and dish information
MENUList or card layout, photos, dish labels and filter chips, allergens and calories, the per-dish note, search, Veg filter and the floating basket.
Delivery and pickup
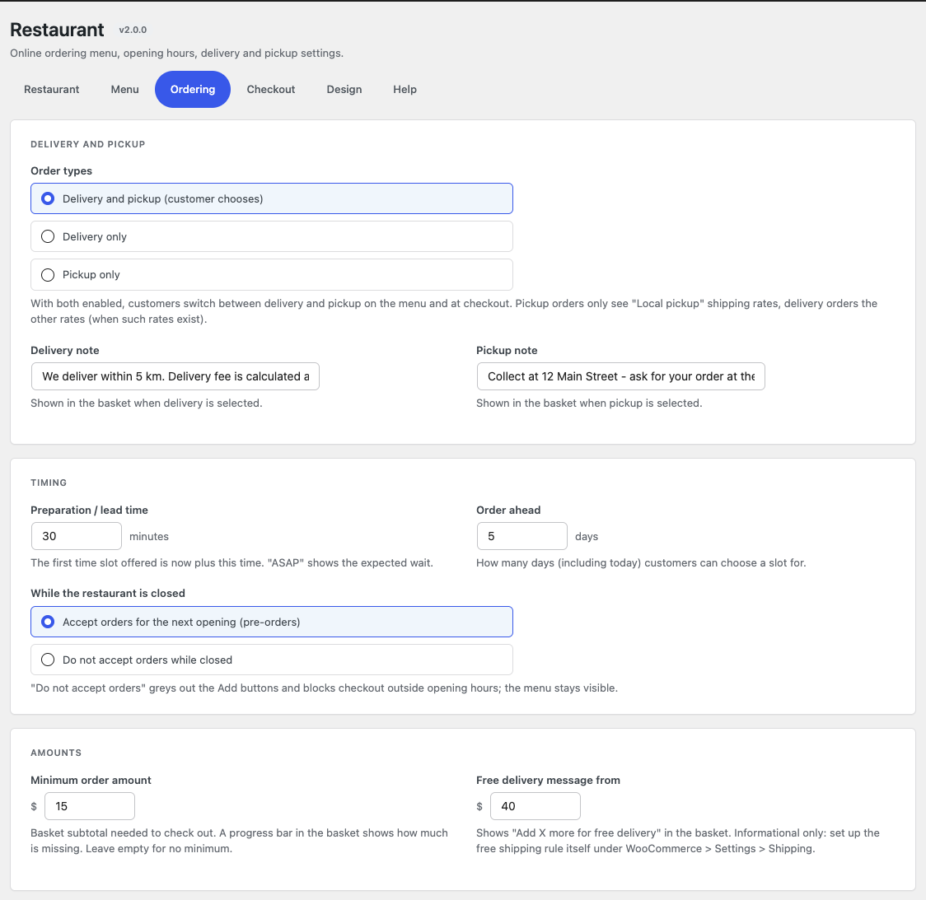
ORDERINGBoth (the customer chooses), delivery only or pickup only, with a delivery note and a pickup note shown in the basket.
Timing
ORDERINGPreparation / lead time in minutes, how many days ahead customers can order, and whether orders are accepted while you are closed.
Amounts
ORDERINGMinimum order amount with a progress bar in the basket, and the threshold for the “Add X more for free delivery” hint.
Day and time slot
CHECKOUTAsk for a day, ask for a time slot, slot length in minutes, and a preview of the slots offered for the next days.
Colours and shape
DESIGNAccent, text, muted text, surfaces, borders and the diet marks as colour tokens, a corner-radius slider and a custom CSS box.
07
Requirements & installation
Who needs this WooCommerce restaurant plugin
Restaurants, takeaways, cafés, bakeries, cloud kitchens and caterers that sell through WooCommerce and want a single, mobile-friendly ordering page with delivery or collection and a chosen time, without a separate ordering platform or commission.
Requirements
- WordPress 6.3 or later (tested up to 7.1)
- WooCommerce 8.0 or later (tested up to 11.1)
- PHP 7.4 or later
- Optional: the free PPOM for WooCommerce plugin for add-ons such as toppings and sauces
Installation
- Upload the plugin zip in Plugins > Add Plugin > Upload Plugin and activate it. WooCommerce must be active.
- If you use the free Restaurant for WooCommerce plugin, you can deactivate it: this plugin takes over the shortcode automatically.
- Go to Plugins > WpExperts Hub Licences, paste your licence key and click Activate licence. The licence is used for automatic updates.
- Add the shortcode
[wxp_restaurant]to a page. - Go to WooCommerce > Restaurant to set the opening hours, delivery and pickup, checkout fields and colours.
Updating from version 1.x
- Your opening hours, messages and checkout settings are kept. Existing sites stay delivery-only until you enable pickup under Ordering.
- The old colour settings are not carried over: the Design tab has new colour tokens with sensible defaults.
- Theme overrides of the old templates must be redone for the new markup (templates/menu.php, header.php, basket.php).
08
Documentation & support
DocumentationSetup guide and configuration reference. (opens in a new tab)
TutorialHow to Turn WooCommerce into a One-Page Restaurant Ordering Menu
Email supportsupport@wpexpertshub.com Include your order ID for faster help.
CustomisationNeed a change or an integration? Ask the developers who wrote it.
09
Frequently asked questions
Which plugin do I get with this product?
Advanced Restaurant for WooCommerce, the paid plugin. The free Restaurant for WooCommerce plugin on WordPress.org has the one-page menu, popup, basket and Veg filter; this plugin adds delivery or pickup, opening hours with split periods and closed dates, lead time and time slots at checkout, pre-orders or no orders while closed, a minimum order, dish labels, allergens and calories, PPOM add-ons, per-dish notes, the orders-list column and the design settings. When it is active the free plugin stays idle.
How do delivery and pickup work?
Under WooCommerce → Restaurant → Ordering choose delivery and pickup, delivery only or pickup only. With both, customers switch on the menu, in the basket and at checkout. The choice is saved on the order and shown everywhere the order is. Add a “Local pickup” method to your shipping zone: pickup orders then only see the local pickup rates and delivery orders the other rates.
How are the time slots calculated?
From the opening hours of each day (both periods), skipping closed dates, for today and the next days of the order-ahead window (1 to 14 days). The first slot is now plus your preparation time, rounded up to the slot length; “ASAP (about N min)” is offered while you are open. Slots are checked again when the order is placed.
Can customers order while the restaurant is closed?
Your choice. “Accept orders for the next opening” (the default) shows “Closed · Opens Tuesday at 10:00 am · Pre-order for later” and offers the next slots. “Do not accept orders while closed” greys out the Add buttons and blocks the checkout until you open; the menu stays visible. The “Temporarily closed” switch refuses orders at any time with your own message.
How do add-ons (toppings, sauces, sizes) work?
Sizes and similar choices are WooCommerce variations, shown as option pills. Extras come from the free PPOM for WooCommerce plugin: attach a field group to a simple product and its select, radio, checkbox (with minimum and maximum), text and textarea fields appear in the popup with their fixed or percentage prices. Required fields and limits are checked in the browser and again on the server.
Does it work with the WooCommerce Checkout block?
Yes. The classic checkout gets Delivery / Pickup pills and day and time selects; the Checkout block gets an Order type and a Delivery / pickup time drop-down under Additional order information. Both save to the same order fields. HPOS is supported.
Where do I set the spice level, labels and allergens?
On the Restaurant tab of the product editor (simple and variable products): spice level, the labels Popular, New, Chef’s special, Vegan, Gluten-free and Dairy-free, a comma-separated allergen list and calories. “Is Non-Vegetarian” is the checkbox next to the product type.
Can I show only some categories, or use the card layout?
Yes. [wxp_restaurant categories=”starters,mains,drinks”] lists only those category slugs in that order, and [wxp_restaurant layout=”grid”] uses the card layout on that page regardless of the Menu setting.
What happens to my settings when I update from version 1.x?
Opening hours, messages and checkout settings are kept. Your site stays delivery-only until you enable pickup under Ordering. The old colour settings are not carried over (the Design tab has new colour tokens), and theme overrides of the old templates must be redone for the new markup.
Can I change the colours or the layout?
The Design tab sets nine colour tokens, the corner radius and custom CSS; your theme’s font is used. For a different layout copy templates/menu.php, header.php or basket.php to your-theme/advanced-restaurant-for-woocommerce/ and edit the copy.
How do I activate my licence and get updates?
Your licence key is emailed after purchase and is also shown in My Account → Downloads. In WordPress go to Plugins → WpExperts Hub Licences, paste the key and click Activate licence. New versions then appear on the normal Dashboard → Updates screen. A key can be active on as many live sites as you purchased; staging and local development sites do not count.
Does the plugin contact any outside server?
Only the licence and update check contacts wpexpertshub.com. The menu, the basket and the checkout talk to your own site; no order or customer data leaves it.
How do I get support?
Email support@wpexpertshub.com with your order ID and the address of your menu page.
10
Customer reviews
Thanks for your review!
It’s waiting for approval and will appear here soon. We’ll email you when it’s live.
Be the first to review it
Used Advanced Restaurant for WooCommerce on your store? A short review helps other store owners decide — and tells us what to improve.
Advanced Restaurant for WooCommerce$49